A custom-built roof rack offers maximum freedom in the use of your vehicle. Whether for crafts, camping, outdoor adventures or transport solutions for commercial use - a DIY roof rack system can be adapted exactly to your own requirements. Especially in combination with airline rails, roof trusses and crossbars, modular roof structures are created that are stable, durable and can be extended at any time.
In this article, we show you how to build a self-built roof truss, which components are required for this and why different heights and angles of the roof truss frame play a decisive role. At the same time, you will receive practical tips on planning, installation and extension - ideal for DIY projects with professional requirements.
Basics of a modular DIY roof truss system
Modern roof girder systems are no longer based on rigid complete solutions, but on modular components. At the heart of a DIY structure are usually airline rails, which are firmly connected to the vehicle roof. They serve as a stable base on which roof racks can be flexibly positioned and bolted.
Onto this roof support frame, crossbars or system profiles are then mounted, which serve as a load-bearing connection between the two sides of the vehicle. The result is a heavy-duty roof support system that can be adapted to new requirements at any time - without drilling into the roof or irreversible conversions.
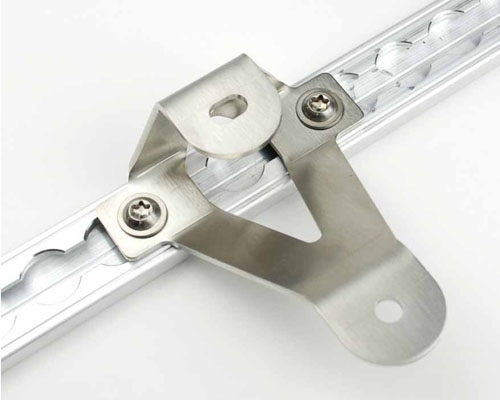
Roof support rails - the connecting element between roof and load
Roof supports are the central connecting element between the airline rail and the crossbar. They ensure the necessary distance to the vehicle roof, compensate for unevenness and enable even load distribution. Choosing the right height is particularly important for DIY bodies.
Depending on the vehicle type, roof shape and planned use, different heights and angles are available. This means that the roof rack can be optimally adapted - whether for flat transport solutions or high superstructures with additional free space.

Different heights of the roof bars at a glance
Several height variants have become established for DIY roof girders, each of which is suitable for different areas of application:
-
40 mm roof support frame
Ideal for particularly flat superstructures. This variant is often used when as little headroom as possible is required - for example for low garages or parking garages. -
55 mm roof support frame
A good compromise between low height and sufficient clearance. Suitable for light loads or flat cross profiles. -
65 mm roof support frame
Very popular for universal DIY solutions. This height offers sufficient space for crossbars and good air circulation. -
75 mm roof support frame
Ideal for stable roof support structures with a higher superstructure, e.g. for toolboxes, solar panels or roof tents. -
100 mm roof support frame
This variant is used when a particularly large distance to the roof is required, for example for uneven roof surfaces or special superstructures.
By combining different heights, even complex roof shapes can be precisely leveled out. This is a major advantage over classic standard roof girders.
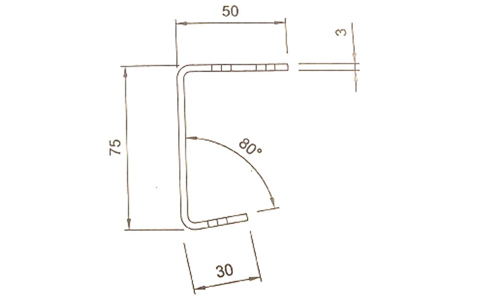
Angle variants: 80° or 90° – when does which one make sense?
In addition to the height, the angle of the roof bars also plays an important role. The most common variants are 80° and 90°.
90° roof bars are particularly suitable for vehicles with a straight roof line. They enable vertical load support and are easy to install.
80°-roof supports are used when the vehicle roof is slightly inclined or an angle needs to be compensated. This means that crossbars stand up straight again despite the sloping roof - a decisive advantage for professional bodies.
Components for the DIY roof rack – what is needed?
The following components are required for a stable and safe DIY roof rack:
- Airline rails (mounted on the vehicle roof)
- Roof support rails at the appropriate height and angle
- Crossbars or system profiles
- Sliding blocks or locking rail nuts (e.g. M8)
- Stainless steel screws or screw fittings
These components can be combined and extended as required. This makes DIY roof bars particularly attractive for users who want to regularly adapt their vehicle to new applications.
Installing a DIY roof rack - step by step
The installation is carried out in several clear steps:
- Properly attach the airline rails to the vehicle roof
- Position the roof rails with screw fittings or lashing rail nuts
- Fit the crossbars to the roof girders
- Align the superstructure and secure all screw connections
A major advantage: the position of the roof beams can be adjusted at any time. This allows crossbars to be moved, additional supports to be added or superstructures to be removed - all without drilling.
DIY roof rack for crafts, camping and leisure
A self-built roof rack is suitable for numerous areas of application:
- Transporting ladders, pipes or panels in trade
- Mounting roof boxes or roof tents when camping
- Fixing solar panels or additional headlights
- Recreational solutions for bicycles, canoes or surfboards
Thanks to the modular design, these applications can be combined or modified at any time - a clear advantage over ready-made roof rack systems.
Conclusion: DIY roof support – maximum freedom with maximum stability
A DIY roof bar based on airline rails, roof bar profiles and crossbars is the ideal solution for anyone who values flexibility, stability and individuality. With a choice of different heights from 40 mm to 100 mm and angles of 80° and 90°, almost any vehicle roof can be optimally equipped.
Whether for everyday work or the next adventure - with a modular roof rack system, you are always flexible and can use your vehicle exactly as you need it.
Frequently asked questions about the DIY roof rack with airline rails
Why is a DIY roof rack better than a prefabricated roof rack system?
A DIY roof rack offers significantly more flexibility than a prefabricated system. Thanks to the modular design with airline rails, roof rack rails and crossbars, the structure can be adapted precisely to the vehicle, use and subsequent extensions. Positions can be changed, additional supports added or superstructures converted at any time - without drilling new holes.
Which roof rack height is right for my vehicle?
The choice of height depends on the intended use. 40 mm and 55 mm are suitable for very flat superstructures with minimal overall height. 65 mm is a universal solution for many DIY roof trusses. 75 mm offers more space for cross beams, solar panels or toolboxes. 100 mm is used when a large distance to the roof or height compensation is required.
Can I combine different roof support heights?
Yes, that's one of the biggest advantages of a modular system. Different heights can be combined to compensate for roof undulations or vehicle unevenness. This means that crossbars stand up straight again despite uneven roof profiles - ideal for professional and visually clean superstructures.
When are 80°- and when are 90°-roof beams useful?
90° roof bars are suitable for vehicles with a straight roof and enable vertical load support. 80°-roof rails are used when the roof is slightly inclined. They compensate for the angle so that crossbars can be mounted straight - particularly important for roof tents, solar panels or wide loads.
What components are needed for a DIY roof rack?
A typical DIY roof rack consists of airline rails on the vehicle roof, matching roof rack profiles, crossbars or system profiles and fastening elements such as sliding blocks, lashing rail nuts or screw fittings. All components can be combined modularly and extended at any time.
Is a self-built roof rack stable enough for everyday use?
When professionally installed, a DIY roof rack is stable and durable. The load is evenly distributed on the vehicle roof via airline rails. High-quality stainless steel or steel roof rails ensure a secure connection between the roof and crossbar - even for commercial use.
Can the DIY roof truss be extended or converted at a later date?
Yes, that's one of the biggest advantages. Cross beams can be moved, additional roof beams can be added or new superstructures can be fitted. The system grows with the requirements - from trade use to camping or leisure vehicles.